
I completed all the backlogs for this blog development about a month ago. Well, honestly the changes were more like gradual instead of abrupt. But at this point, I see it had undergone some serious changes that I think it's proper to label this as a big update. You can see the source code on my GitHub. Now, let's see the improvements!
Quick update overview:
- Registered a new domain name
- Switched from Single Page Application (SPA) to Fullstack Static Site Generator (SSG)
- Introduced subscription support via RSS feed
- Implemented unread comment notifications
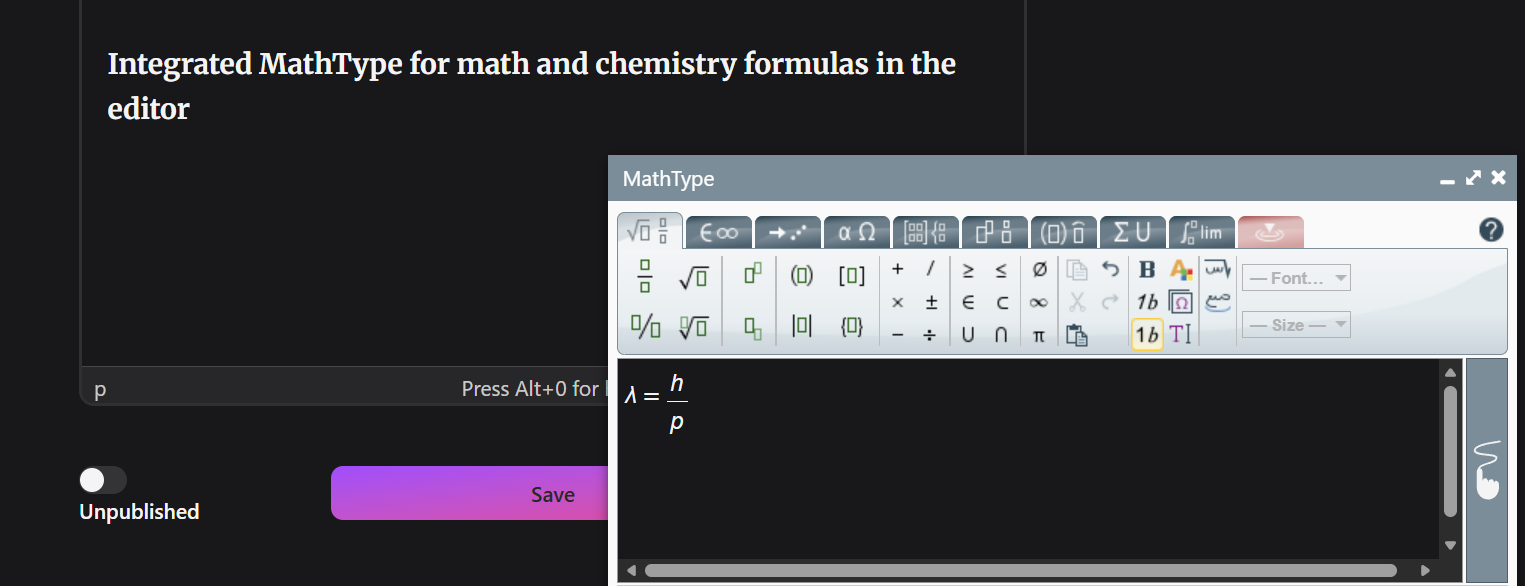
- Integrated MathType for math and chemistry formulas in the editor
- Added web traffic analytics powered by Cloudflare
- Other improvements and bug fixes
Registered a new domain name
Now in addition to the old domain at stacked-stories.pages.dev (Stacked Stories) and stacked-control.pages.dev (Stacked Control), I registered a new domain so you can also access Stacked Stories at blog.gofhilman.my.id and Stacked Control at control.gofhilman.my.id.
There are several reasons I made this change. First, to prevent my blog from being flagged as an unsafe site when sharing Cloudflare Pages domain links on social platforms like LinkedIn. Second, to enhance search engine indexing on platforms such as Google and Bing. And I think it looks more professional when we rent a custom domain. I only spent USD 0.74 (IDR 13,000) per year to rent it. And that actually is the only price I need to pay for running this fullstack blog.
Switched from Single Page Application (SPA) to Fullstack Static Site Generator (SSG)
I think this is the most important update. Back then when using SPA, the blog loading time was super slow since I used a free plan server in a Platform as a Service so it would sleep (inactive) if it's not been used for several minutes. There was also a problem when bot crawlers tried to analyze the page because they need to execute the javascripts and wait for several seconds to get the content of the page. If they wait too long, they'll stop the process and fail to index it.
My solution to these problems is to switch the blog (the user front end) from SPA to fullstack SSG. Static Site Generator means the app will prerender all pages (routes) at the build time. I haven't analyze the performance improvement in details, but SSG is definitely multiple times faster than the SPA approach since the whole page content (HTML, CSS, JavaScript) is served directly from the CDN. To prerender the routes in React Router Framework Mode, we can modify react-router.config.ts, for example:
import type { Config } from "@react-router/dev/config";
import { getPublishedPosts } from "./app/api/postsApi";

export default {
  // Config options...
  // Server-side render by default, to enable SPA mode set this to `false`
  ssr: false,
  async prerender() {
    const { posts } = await getPublishedPosts();
    return ["/", "/rss.xml", ...posts.map((post: any) => `/${post.uri}`)];
  },
} satisfies Config;
The next thing we do is to adjust the routes to accomodate this prerender process, for example, by adding the normal route loader on top of clientLoader.
Not everything in this blog is prerendered, which is why I refer to it as a fullstack SSG. For an instance, the post filtering and pagination, the comment section, and the authentication are still processed by using the API fetch method because we need a backend server to do that. The combination of using static pages directly served from a CDN for time-critical components and a backend server for the rest is what makes this blog an interesting development.
Maybe there is a question,
So do we have to deploy the user frontend manually whenever we finished created a new post?
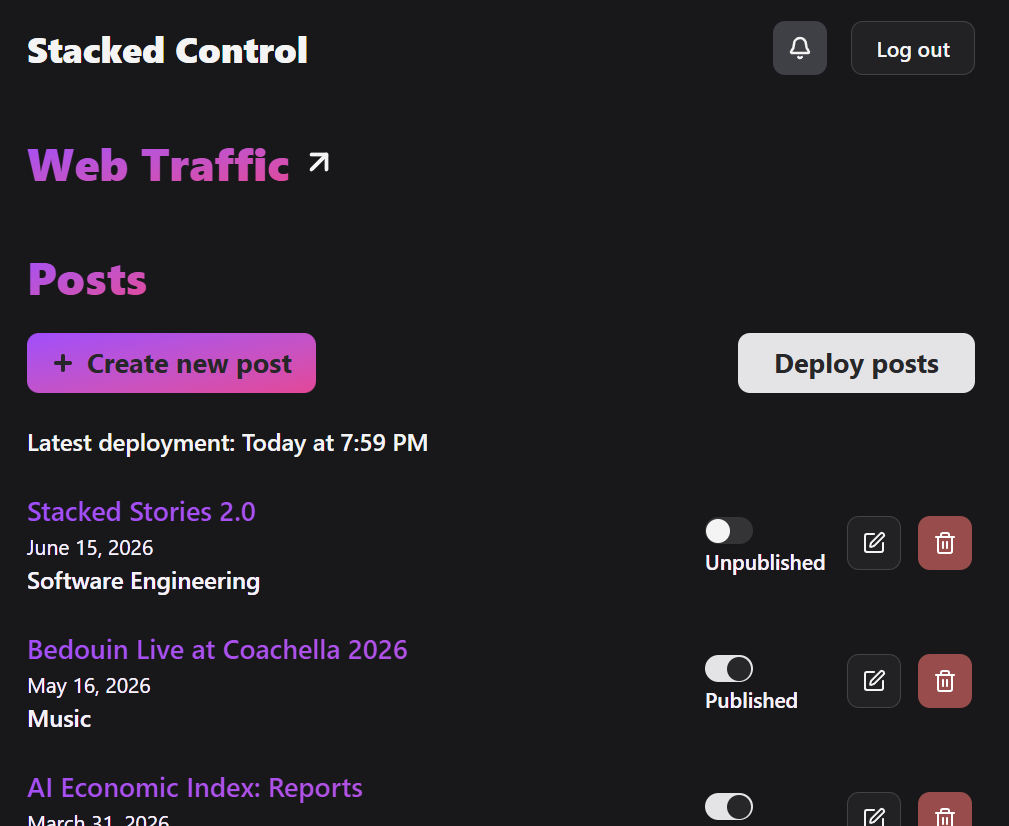
The answer is no. In Cloudflare Pages, we can use a deploy hook to trigger the deployment through a webhook request. In my case, I created a webhook for my Stacked Stories blog (the user front end) and connected it to the back end via Stacked Control (the admin front end). Whenever I want to rebuild the blog and prerender all routes, I simply click the “Deploy posts” button in Stacked Control, as shown in the image below.
We can create a webhook in Cloudflare Pages through the dashboard by going to the setting of the user frontend project as shown below.
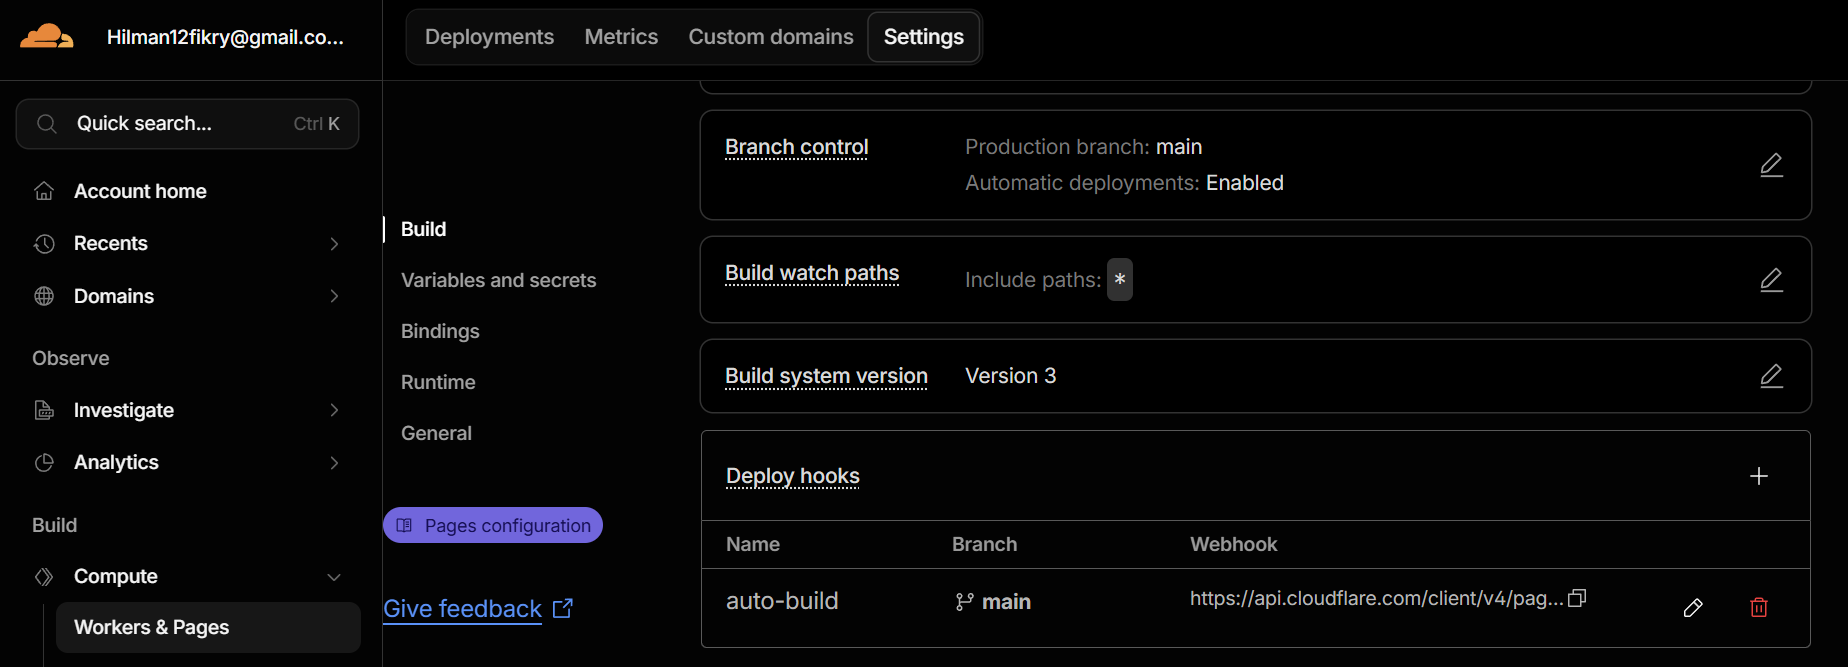
Next, we need to put the webhook url into our .env file on the back end, which is going to be used later in our backend API to deploy the user front end. Hiding it in .env file keeps our webhook url safe from being misused by someone.
Taking into account that my database schema is visualized as the following image,
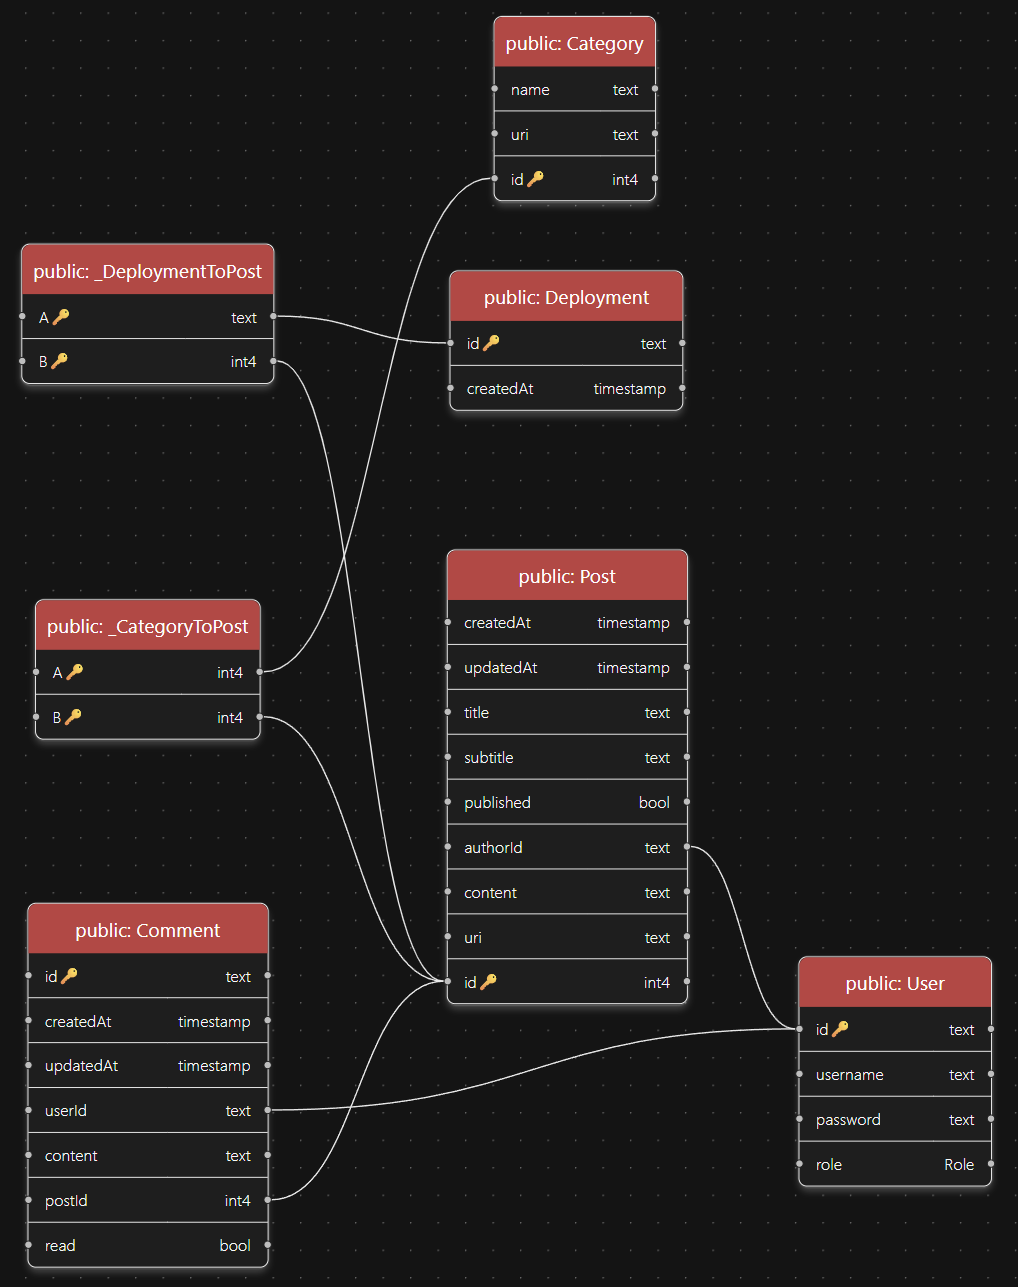
this is how I create the deployment API via webhook by using Prisma ORM,
// deploymentRouter.ts

import { Router } from "express";
import {
  deploymentPost,
  latestDeploymentGet,
} from "../controllers/deploymentController";
import { isAdminAuth } from "../middleware/auth";

const deploymentRouter = Router();

deploymentRouter.get("/latest", latestDeploymentGet);
deploymentRouter.post("/", isAdminAuth, deploymentPost);

export default deploymentRouter;
// deploymentController.ts

import { prisma } from "../lib/prisma";

async function latestDeploymentGet(req: any, res: any) {
  const latestDeployment = await prisma.deployment.findFirst({
    orderBy: { createdAt: "desc" },
  });
  res.json({ latestDeployment });
}

async function deploymentPost(req: any, res: any) {
  await fetch(
    process.env.CF_PAGES_DEPLOY_HOOK ??
      (() => {
        throw new Error("CF_PAGES_DEPLOY_HOOK missing");
      })(),
    { method: "POST" },
  );
  const posts = await prisma.post.findMany({
    orderBy: { createdAt: "desc" },
    select: { id: true },
    where: { published: true },
  });
  const deployment = await prisma.deployment.create({
    data: {
      posts: { connect: posts },
    },
  });
  res.json({ deployment });
}

export { latestDeploymentGet, deploymentPost };
deploymentPost funtion will send a POST request to Cloudflare Pages deploy hook and save the event details, such as the event createdAt and the deployed posts, in our database. On the other hand, latestDeploymentGet function will get us the latest deployment info, such as the deploy time and the deployed posts, which later can be displayed on the admin front end like in the previous Stacked Control dashboard image.
Introduced subscription support via RSS feed
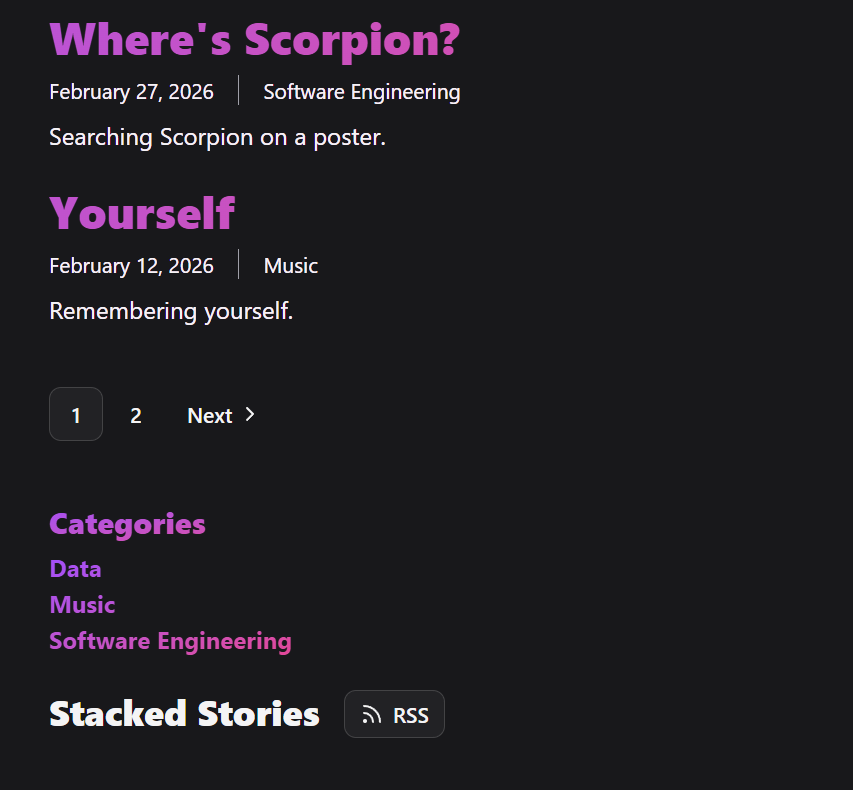
Now, I've added subscription feature to my blog by using RSS feed. RSS allows us to view this blog web contents in their simplest form so that they can be delivered to us more neatly. It also lets us to subscribe to feeds without the need to provide personal information, such as email address. You can find this blog RSS page by clicking the RSS button at the bottom section of my blog, as shown in the following image.
I wrote another post about a brief introduction of RSS and how to subscribe to an RSS feed here.
Ok, so how did I create the RSS page manually?
The RSS page just contains XML code with RSS specification. We can find the specification here on their official website. And this is how I write the page route on my user front end in React Router Framework Mode:
// rss.ts
import { getPublishedPosts } from "~/api/postsApi";
import type { Route } from "./+types/rss";
const SITE_TITLE = "Stacked Stories";
const SITE_DESCRIPTION = "A blog by Hilman Fikry";
function escapeXml(value: unknown) {
return String(value ?? "")
.replace(/&/g, "&")
.replace(/</g, "<")
.replace(/>/g, ">")
.replace(/"/g, """)
.replace(/'/g, "'");
}
function getBlogRootUrl(request: Request) {
const configuredUrl = import.meta.env.VITE_BLOG_URL?.trim();
if (configuredUrl) {
return configuredUrl.replace(/\/+$/, "");
}
return new URL(request.url).origin;
}
function toRssDate(value: string) {
return new Date(value).toUTCString();
}
export async function loader({ request }: Route.LoaderArgs) {
const { posts } = await getPublishedPosts();
const blogRootUrl = getBlogRootUrl(request);
const publishedPosts = posts.filter(
(post: any) => post.published && post.createdAt && post.uri,
);
const lastBuildDate = publishedPosts[0]?.createdAt
? toRssDate(publishedPosts[0].createdAt)
: new Date().toUTCString();
const items = publishedPosts
.map((post: any) => {
const postUrl = `${blogRootUrl}/${post.uri}`;
const categories = Array.isArray(post.categories)
? post.categories
.map(
(category: any) =>
` <category>${escapeXml(category.name)}</category>`,
)
.join("\n")
: "";
return ` <item>
<title>${escapeXml(post.title)}</title>
<link>${escapeXml(postUrl)}</link>
<guid isPermaLink="true">${escapeXml(postUrl)}</guid>
<pubDate>${escapeXml(toRssDate(post.createdAt))}</pubDate>
<description>${escapeXml(post.subtitle)}</description>${categories ? `\n${categories}` : ""}
</item>`;
})
.join("\n");
const rss = `<?xml version="1.0" encoding="UTF-8"?>
<rss version="2.0">
<channel>
<title>${escapeXml(SITE_TITLE)}</title>
<link>${escapeXml(blogRootUrl)}</link>
<description>${escapeXml(SITE_DESCRIPTION)}</description>
<language>en</language>
<lastBuildDate>${escapeXml(lastBuildDate)}</lastBuildDate>
${items}
</channel>
</rss>`;
return new Response(rss, {
headers: {
"Content-Type": "application/rss+xml; charset=utf-8",
},
});
}
In this way, I can create the RSS page automatically whenever the site is built.
Implemented unread comment notifications
Although it's rare to see comments in my blog, previously there was no way for me to know if someone commented on my blog post unless I checked it manually in the respective post. However, it's no longer the case now because I've already implemented unread comment notifications in Stacked Control (the admin front end). The Stacked Control dashboard now includes a notification button with a badge count. Clicking the button opens a popover showing unread comments, and you can navigate directly to the relevant comment from there, as shown as this following example image.
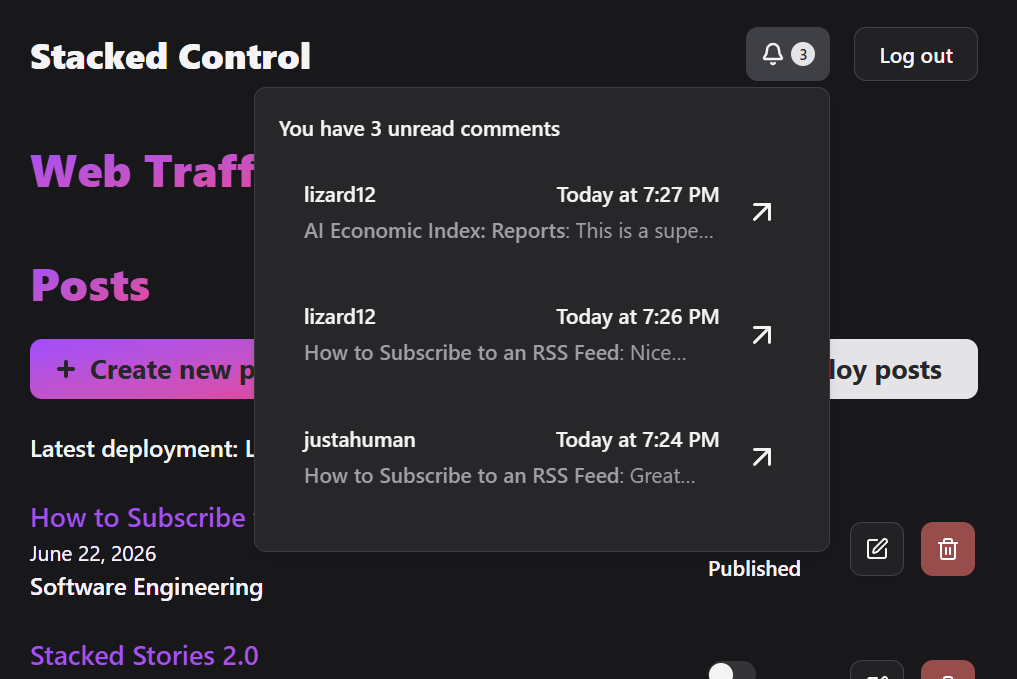
To implement this, first we have to make sure we have "read" field in the the comment model of the database schema, where the default value is set to false. It means that whenever new comments are made, they will be marked as unread.
To query unread comments in my database, I created an API endpoint that uses the following function built with Prisma ORM,
async function unreadCommentsGet(req: any, res: any) {
  const unreadComments = await prisma.comment.findMany({
    orderBy: { createdAt: "desc" },
    where: { read: false },
    select: {
      id: true,
      createdAt: true,
      updatedAt: true,
      content: true,
      post: {
        select: {
          title: true,
          uri: true,
        },
      },
      user: {
        select: {
          username: true,
        },
      },
    },
  });
  res.json({ comments: unreadComments });
}
I also created another API endpoint that uses the following function to update a comment status to "read",
async function commentReadPatch(req: any, res: any) {
  const comment = await prisma.comment.update({
    where: { id: req.params.commentId },
    data: { read: true },
  });
  res.json({ comment });
}
The latter function is useful when an admin visits the comment section of the unread comment in either the admin or user front end. For example, it can be triggered through React side effects to mark comments as "read" in the admin and user front ends,
// The React side effect in the admin front end

const readPatchFetcher = useFetcher();
let { categoryNames, post, comments } = loaderData;

useEffect(() => {
  comments
    .filter((comment: any) => !comment.read)
    .forEach((comment: any) => {
      readPatchFetcher.submit(
        {},
        {
          action:
            "/posts/" +
            params.postUri +
            "/comments/" +
            comment.id +
            "/read-patch",
            method: "post",
        },
      );
    });
}, [params.postUri]);


// The React side effect in the user front end

const [{ comments }, { user }]: any = use(commentsAndUser);
const readPatchFetcher = useFetcher();

useEffect(() => {
  comments
    .filter((comment: any) => !comment.read)
    .forEach((comment: any) => {
      readPatchFetcher.submit(
        {},
        {
          action: "comments/" + comment.id + "/read-patch",
          method: "post",
        },
      );
    });
}, [user?.role]);
Done! So whenever the admin visits the comment section containing an unread comment, that comment will automatically be marked as "read" and its notification will disappear.
Integrated MathType for math and chemistry formulas in the editor
Now it's possible to write math or chemistry formulas in the editor easily. For example, I can write
in the editor simply by using the MathType user interface, as shown in the following image.
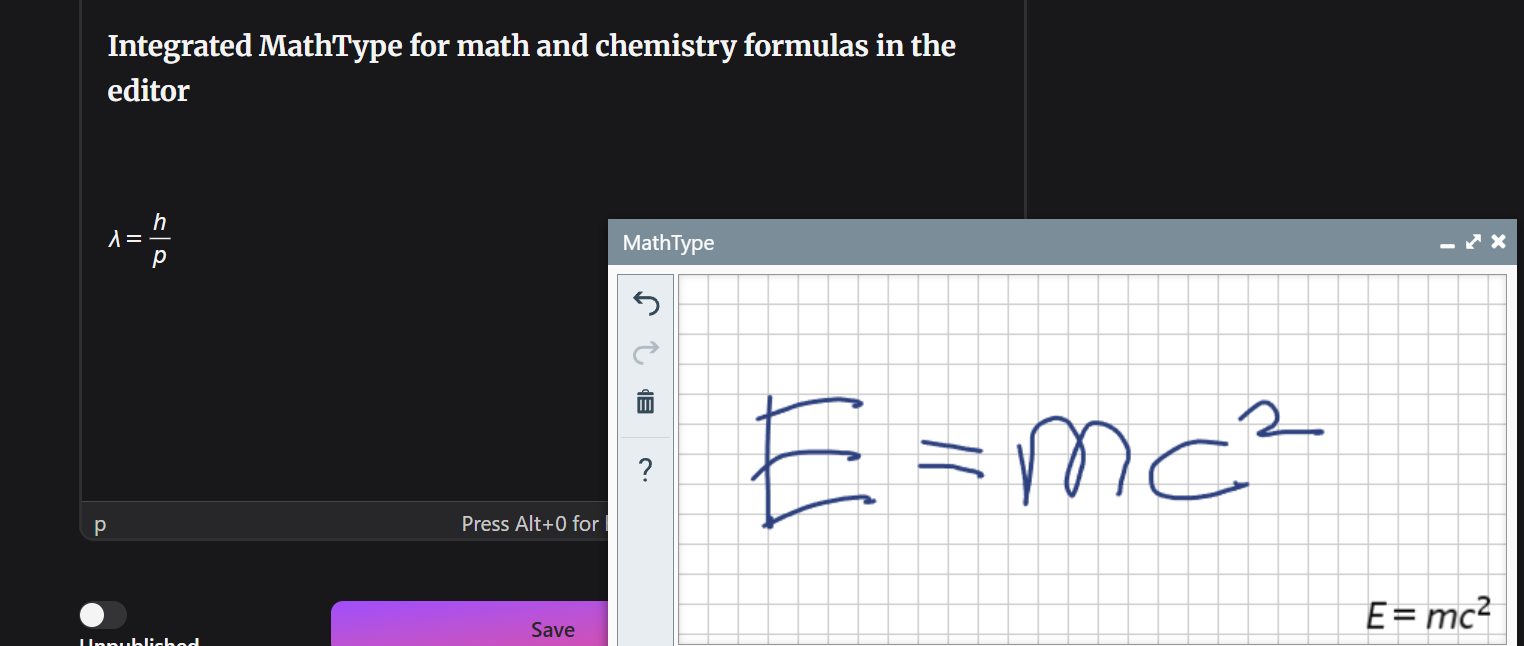
We can also create formulas by handwriting, as shown in this example image.
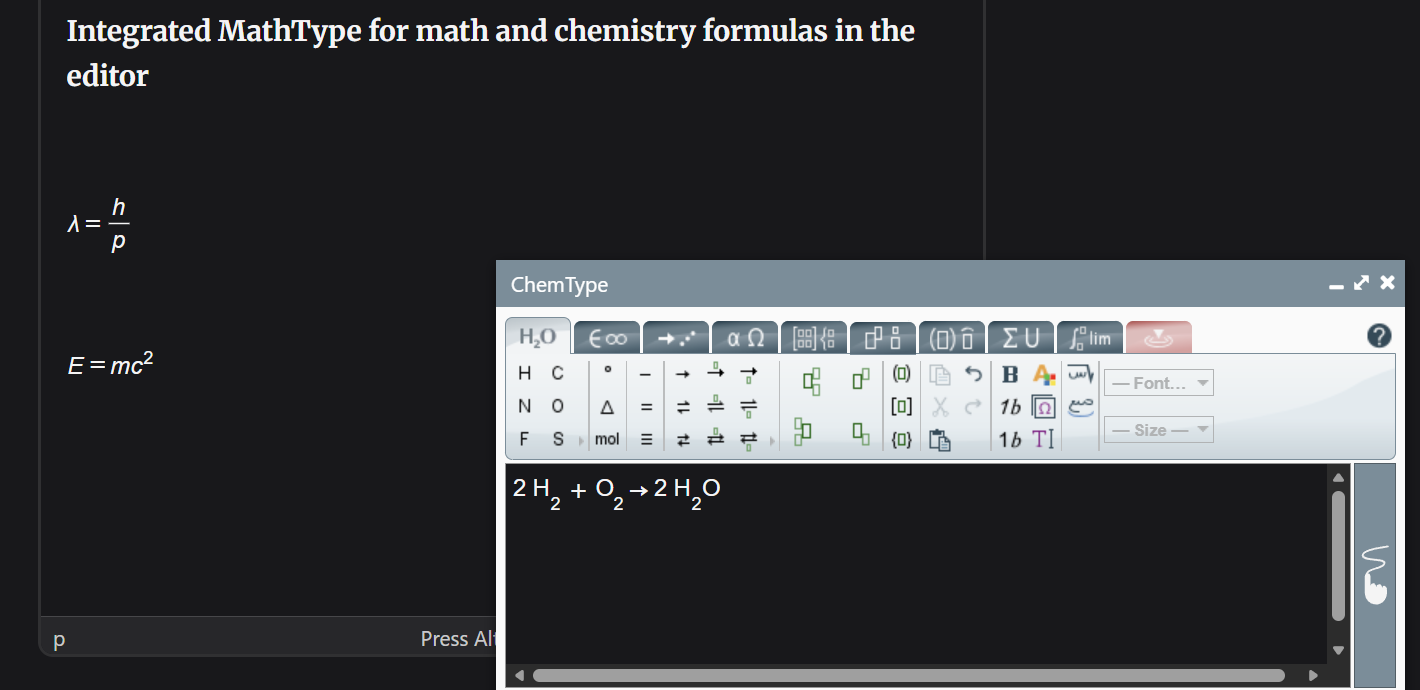
Additionally, it's also possible to create chemical formulas, for example:
To integrate Wiris' MathType in my TinyMCE editor, first, I installed the npm package into the admin front end. Then, I just modified the editor React component based on this official documentation on how to use MathType with TinyMCE in React. I also changed the colors of the MathType text and background so they match my app's color theme. The following code is the example on how I set up my editor component.
// BundledEditor.tsx
import { Editor } from "@tinymce/tinymce-react";
// Ensure to import tinymce first as other components expect
// a global variable `tinymce` to exist
import "tinymce/tinymce";
// DOM model
import "tinymce/models/dom/model";
// Theme
import "tinymce/themes/silver";
// Toolbar icons
import "tinymce/icons/default";
// Import plugins
import "tinymce/plugins/anchor";
import "tinymce/plugins/advlist";
import "tinymce/plugins/autolink";
import "tinymce/plugins/charmap";
import "tinymce/plugins/code";
import "tinymce/plugins/media";
import "tinymce/plugins/visualblocks";
import "tinymce/plugins/fullscreen";
import "tinymce/plugins/insertdatetime";
import "tinymce/plugins/preview";
import "tinymce/plugins/help";
// Include resources that a plugin lazy-loads at the run-time
import "tinymce/plugins/help/js/i18n/keynav/en";
import "tinymce/plugins/image";
import "tinymce/plugins/link";
import "tinymce/plugins/lists";
import "tinymce/plugins/searchreplace";
import "tinymce/plugins/table";
import "tinymce/plugins/wordcount";
import "tinymce/plugins/codesample";
import "tinymce/plugins/autoresize";
import "tinymce/plugins/autosave";
import wirisPlugin from "@wiris/mathtype-tinymce7/plugin.min.js?url";
import { postImage } from "~/api/imageApi";
import editorContent from "~/styles/editor-content.css?url";
import editorCodeSample from "~/styles/prism.css?url";
import "~/lib/prism.js";
export default function BundledEditor(props: any) {
return (
<Editor
licenseKey="gpl"
init={{
placeholder: "Compose your thoughts here.",
height: 500,
plugins: [
"advlist",
"autolink",
"lists",
"link",
"image",
"charmap",
"anchor",
"searchreplace",
"visualblocks",
"code",
"fullscreen",
"insertdatetime",
"media",
"table",
"preview",
"help",
"wordcount",
"codesample",
"autoresize",
"autosave",
],
external_plugins: {
tiny_mce_wiris: wirisPlugin,
},
mathTypeParameters: {
editorParameters: {
color: "#f4f4f5",
backgroundColor: "#18181b",
},
},
toolbar:
"undo redo | blocks | " +
"bold italic forecolor | alignleft aligncenter " +
"alignright alignjustify | bullist numlist outdent indent | " +
"tiny_mce_wiris_formulaEditor tiny_mce_wiris_formulaEditorChemistry | " +
"removeformat | help",
draggable_modal: true,
images_upload_handler: postImage,
skin_url: "dark-zinc",
content_css: [editorContent, editorCodeSample],
codesample_global_prismjs: true,
codesample_languages: [
{ text: "HTML/XML", value: "markup" },
{ text: "JavaScript", value: "javascript" },
{ text: "CSS", value: "css" },
{ text: "SQL", value: "sql" },
{ text: "Go", value: "go" },
{ text: "PHP", value: "php" },
{ text: "Ruby", value: "ruby" },
{ text: "Python", value: "python" },
{ text: "Java", value: "java" },
{ text: "C", value: "c" },
{ text: "C#", value: "csharp" },
{ text: "C++", value: "cpp" },
{ text: "Bash", value: "bash" },
{ text: "YAML", value: "yaml" },
{ text: "Docker", value: "docker" },
],
convert_urls: false,
extended_valid_elements: "iframe[*],div[*],a[*]",
sandbox_iframes: false,
convert_unsafe_embeds: false,
valid_children: "+body[style]",
setup: (editor) => {
editor.on("GetContent", (e) => {
e.content = e.content.replace(
/<(p|div|li|td|th|dd|dt|figcaption|blockquote)((?:\s+[^>]*)?)>\s*<\/\1>/gi,
"<$1$2> </$1>",
);
});
},
}}
{...props}
/>
);
}
Another important step is ensuring that MathType formulas render correctly in the user frontend blog post. Below is an example of my post route in the user front end, which guarantees proper rendering of MathType formulas along with Prism code syntax highlighting.
// post.tsx

import { getMe } from "~/api/authApi";
import type { Route } from "./+types/post";
import { getComments, getSpecificPost } from "~/api/postsApi";
import { Suspense, useEffect, useRef } from "react";
import Comments from "~/components/Comments";
import LoadingThreeDotsJumping from "~/components/ui/LoadingThreeDotsJumping";
import { useFetchers, useNavigation } from "react-router";
import LoadingThreeDotsPulse from "~/components/ui/LoadingThreeDotsPulse";
import formatPublishedDate from "~/lib/formatPublishedDate";
import "~/styles/editor-content.css";
import "~/styles/prism.css";
import "~/lib/prism.js";
import { getCategories } from "~/api/categoriesApi";
import SiteFooter from "~/components/SiteFooter";

declare global {
  interface Window {
    Prism?: any;
    com?: any;
  }
}

export async function loader({ params }: Route.LoaderArgs) {
  const { post } = await getSpecificPost(params.postUri);
  const { categories } = await getCategories();
  return { post, commentsAndUser: null, categories };
}

export async function clientLoader({
  params,
  serverLoader,
}: Route.ClientLoaderArgs) {
  const { post, categories } = await serverLoader();
  const commentsAndUser = Promise.all([getComments(params.postUri), getMe()]);
  return { post, commentsAndUser, categories };
}

clientLoader.hydrate = true;

export function meta({ loaderData }: Route.MetaArgs) {
  const title = `${loaderData.post.title} \u2014 Stacked Stories`;

  return [
    { title },
    { property: "og:title", content: title },
    { name: "description", content: loaderData.post.subtitle },
  ];
}

export default function Post({ loaderData }: Route.ComponentProps) {
  const { post, commentsAndUser, categories } = loaderData;
  const navigation = useNavigation();
  const contentRef = useRef<HTMLDivElement>(null);
  const fetchers = useFetchers();

  useEffect(() => {
    const renderContent = () => {
      if (!contentRef.current) return;
      if (window.com?.wiris?.js?.JsPluginViewer) {
        window.com.wiris.js.JsPluginViewer.parseElement(contentRef.current);
      }
      if (window.Prism) {
        window.Prism.highlightAllUnder(contentRef.current);
      }
    };

    if (window.com?.wiris?.js?.JsPluginViewer) {
      renderContent();
    } else {
      const script = document.getElementById("wiris-script");
      if (script) {
        script.addEventListener("load", renderContent);
        return () => script.removeEventListener("load", renderContent);
      }
    }
  }, [contentRef.current, fetchers.length, post.content]);

  return (
    <>
      <main>
        {navigation.state === "loading" ? (
          <LoadingThreeDotsPulse className="fixed top-1/2 left-1/2 -translate-x-1/2 -translate-y-1/2" />
        ) : (
          <article className="flex flex-col gap-10">
            <section className="flex flex-col gap-1">
              <h2 className="text-3xl font-black">{post.title}</h2>
              <p className="text-sm">{formatPublishedDate(post.createdAt)}</p>
              <div
                dangerouslySetInnerHTML={{ __html: post.content }}
                className="post-content mt-8"
                ref={contentRef}
              ></div>
            </section>
            <section className="flex flex-col gap-5">
              <h3 className="text-xl font-black">Comments</h3>
              {commentsAndUser ? (
                <Suspense
                  fallback={<LoadingThreeDotsJumping className="my-10" />}
                >
                  <Comments commentsAndUser={commentsAndUser} />
                </Suspense>
              ) : (
                <LoadingThreeDotsJumping className="my-10" />
              )}
            </section>
          </article>
        )}
      </main>
      <SiteFooter categories={categories} />
    </>
  );
}
where I put this script in the root html head element:
<script
  id="wiris-script"
  src="https://www.wiris.net/demo/plugins/app/WIRISplugins.js?viewer=image"
></script>
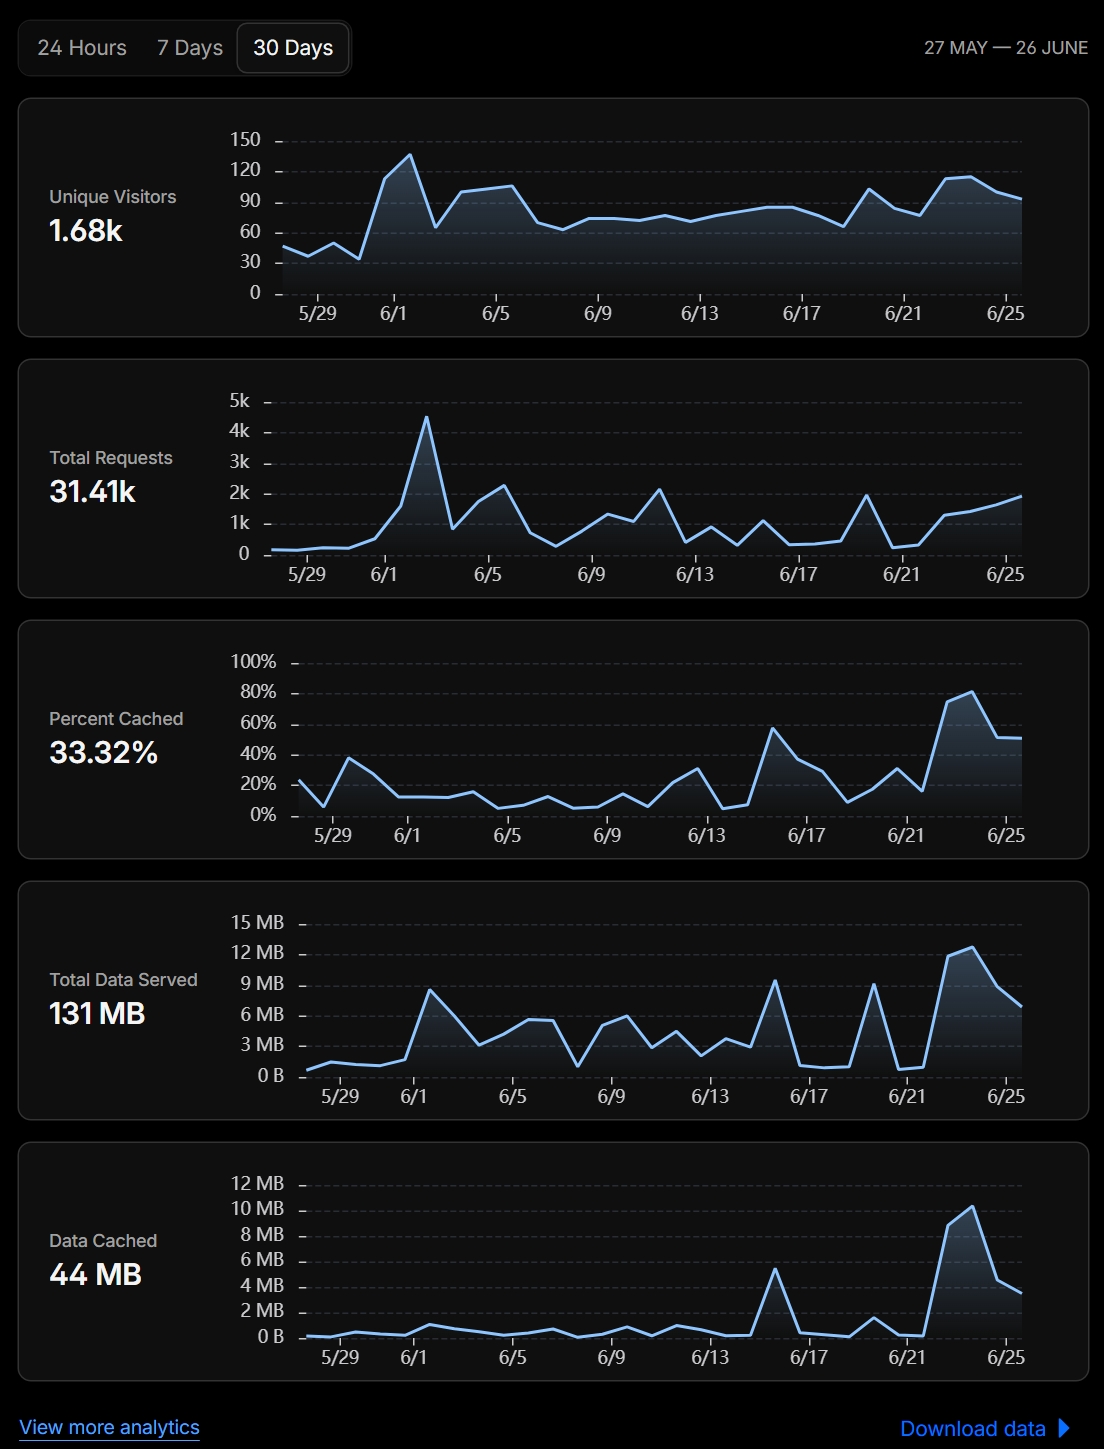
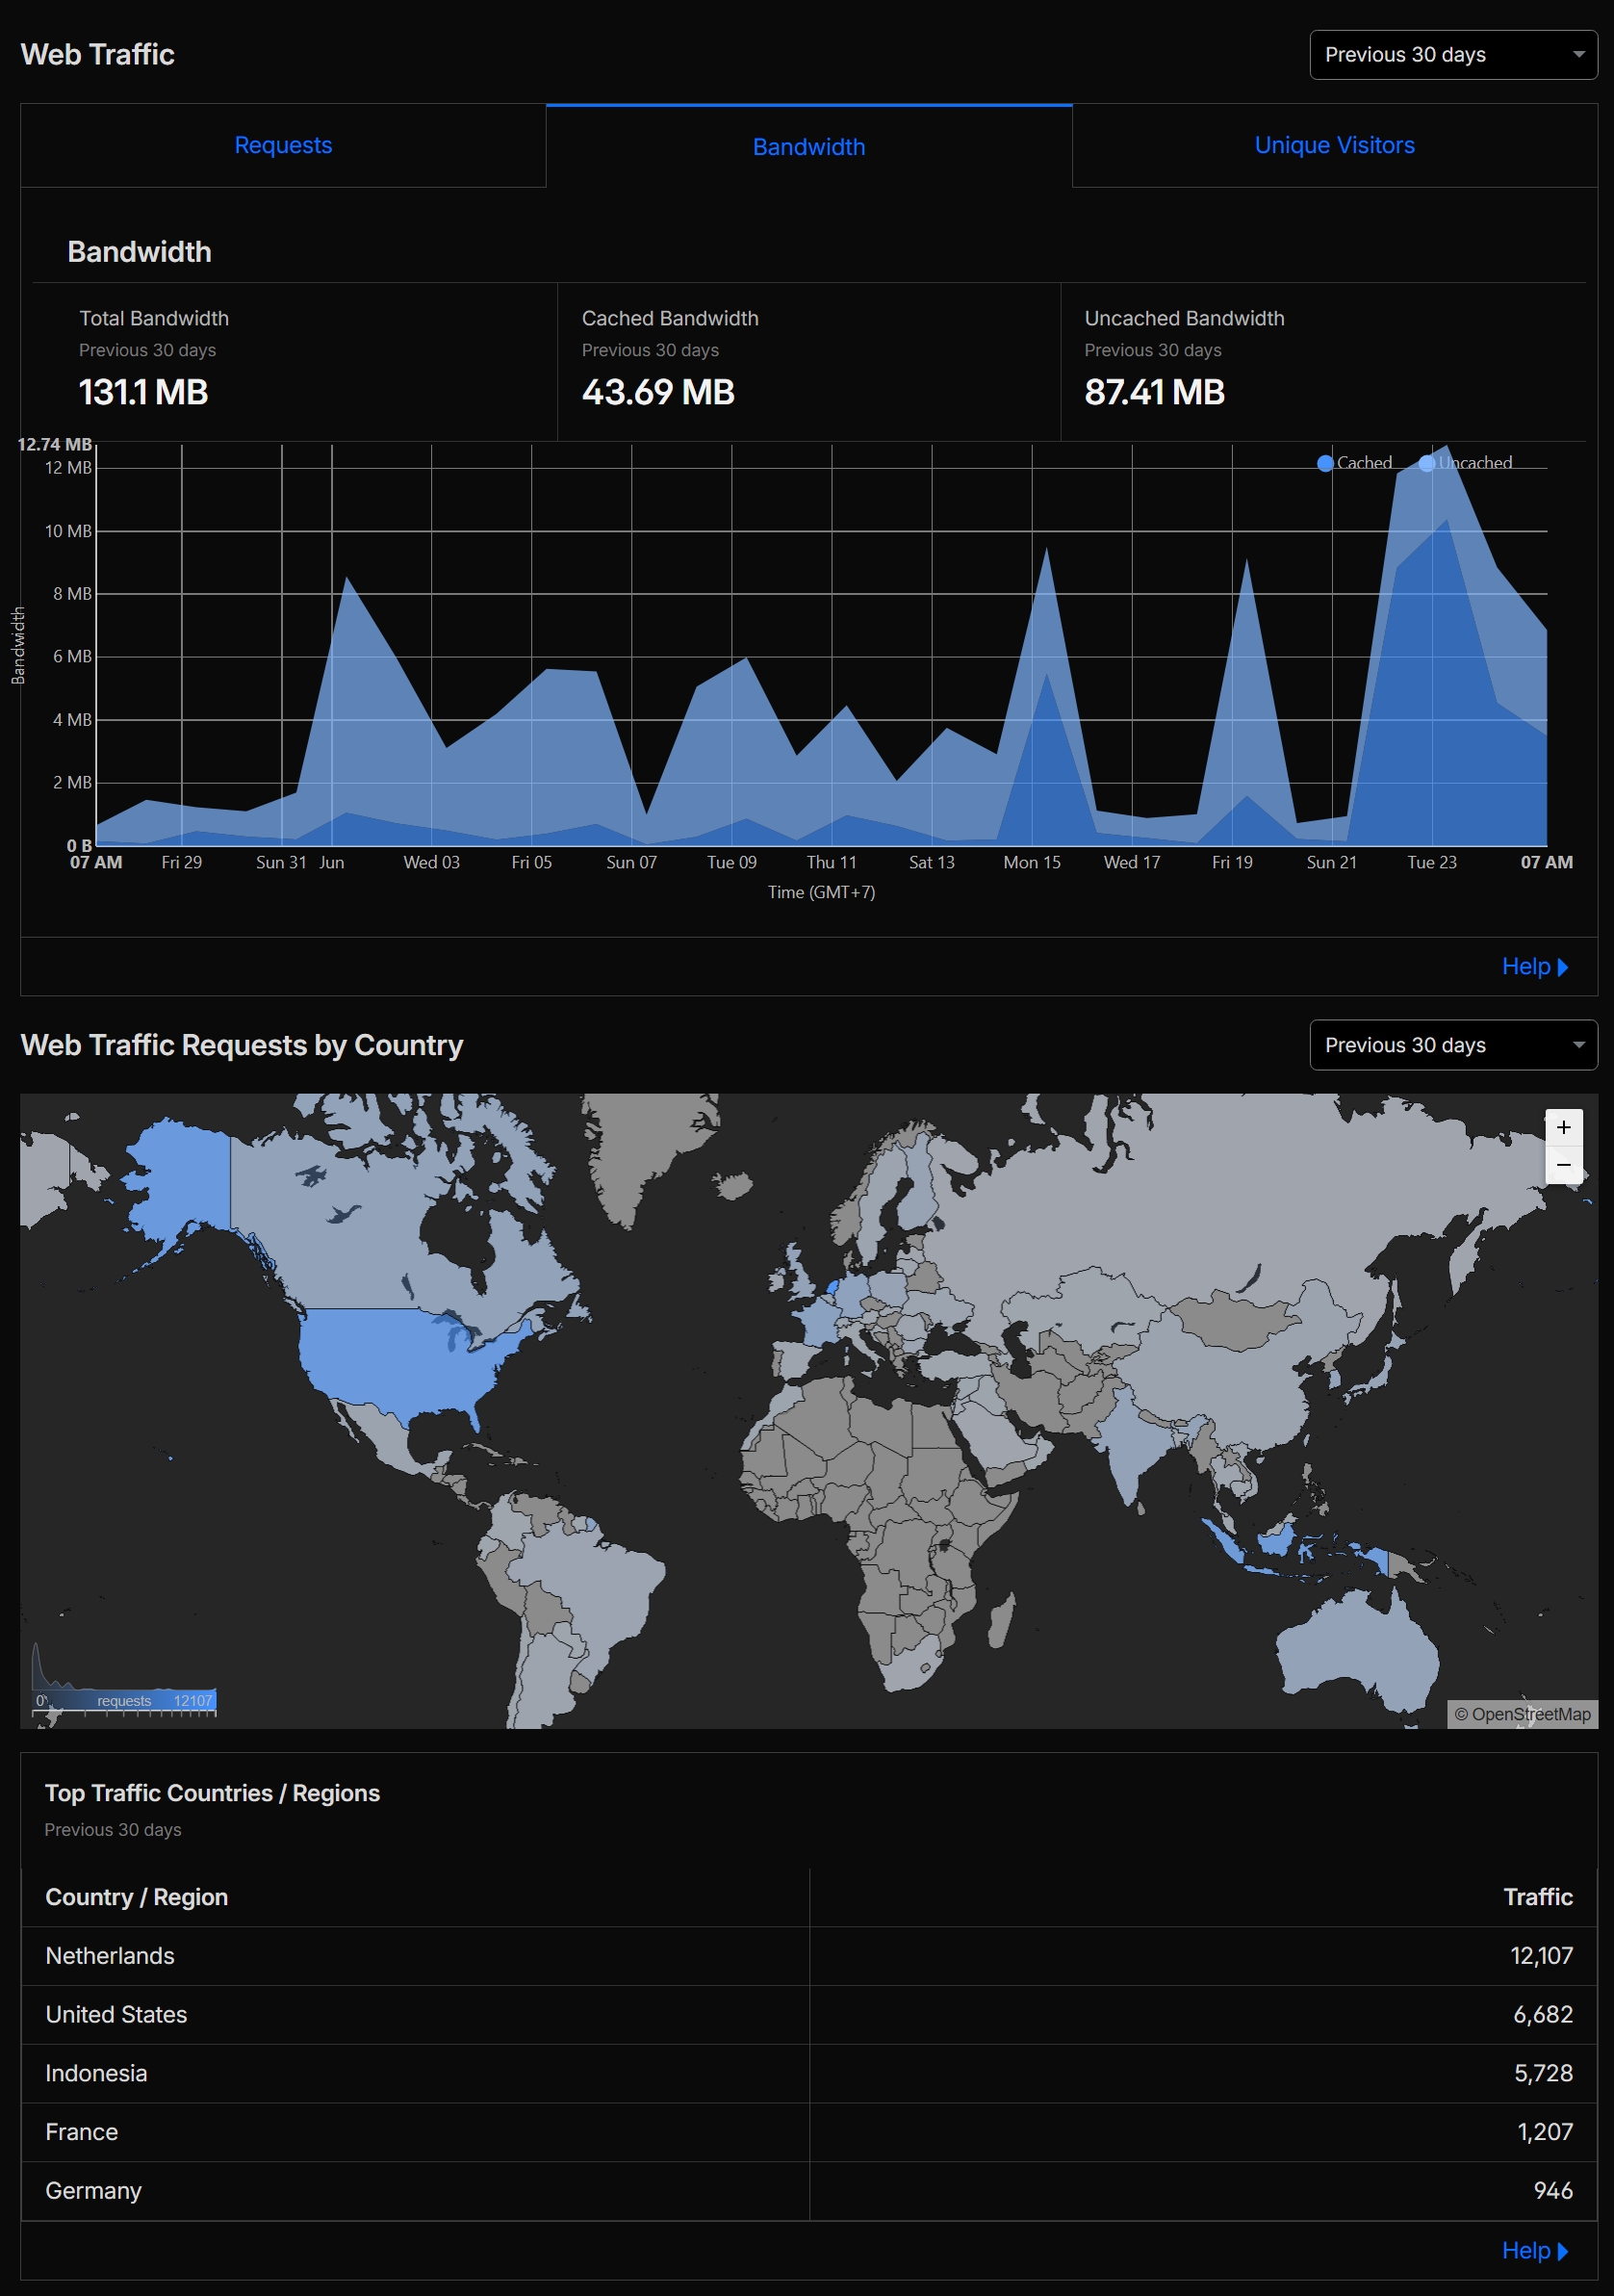
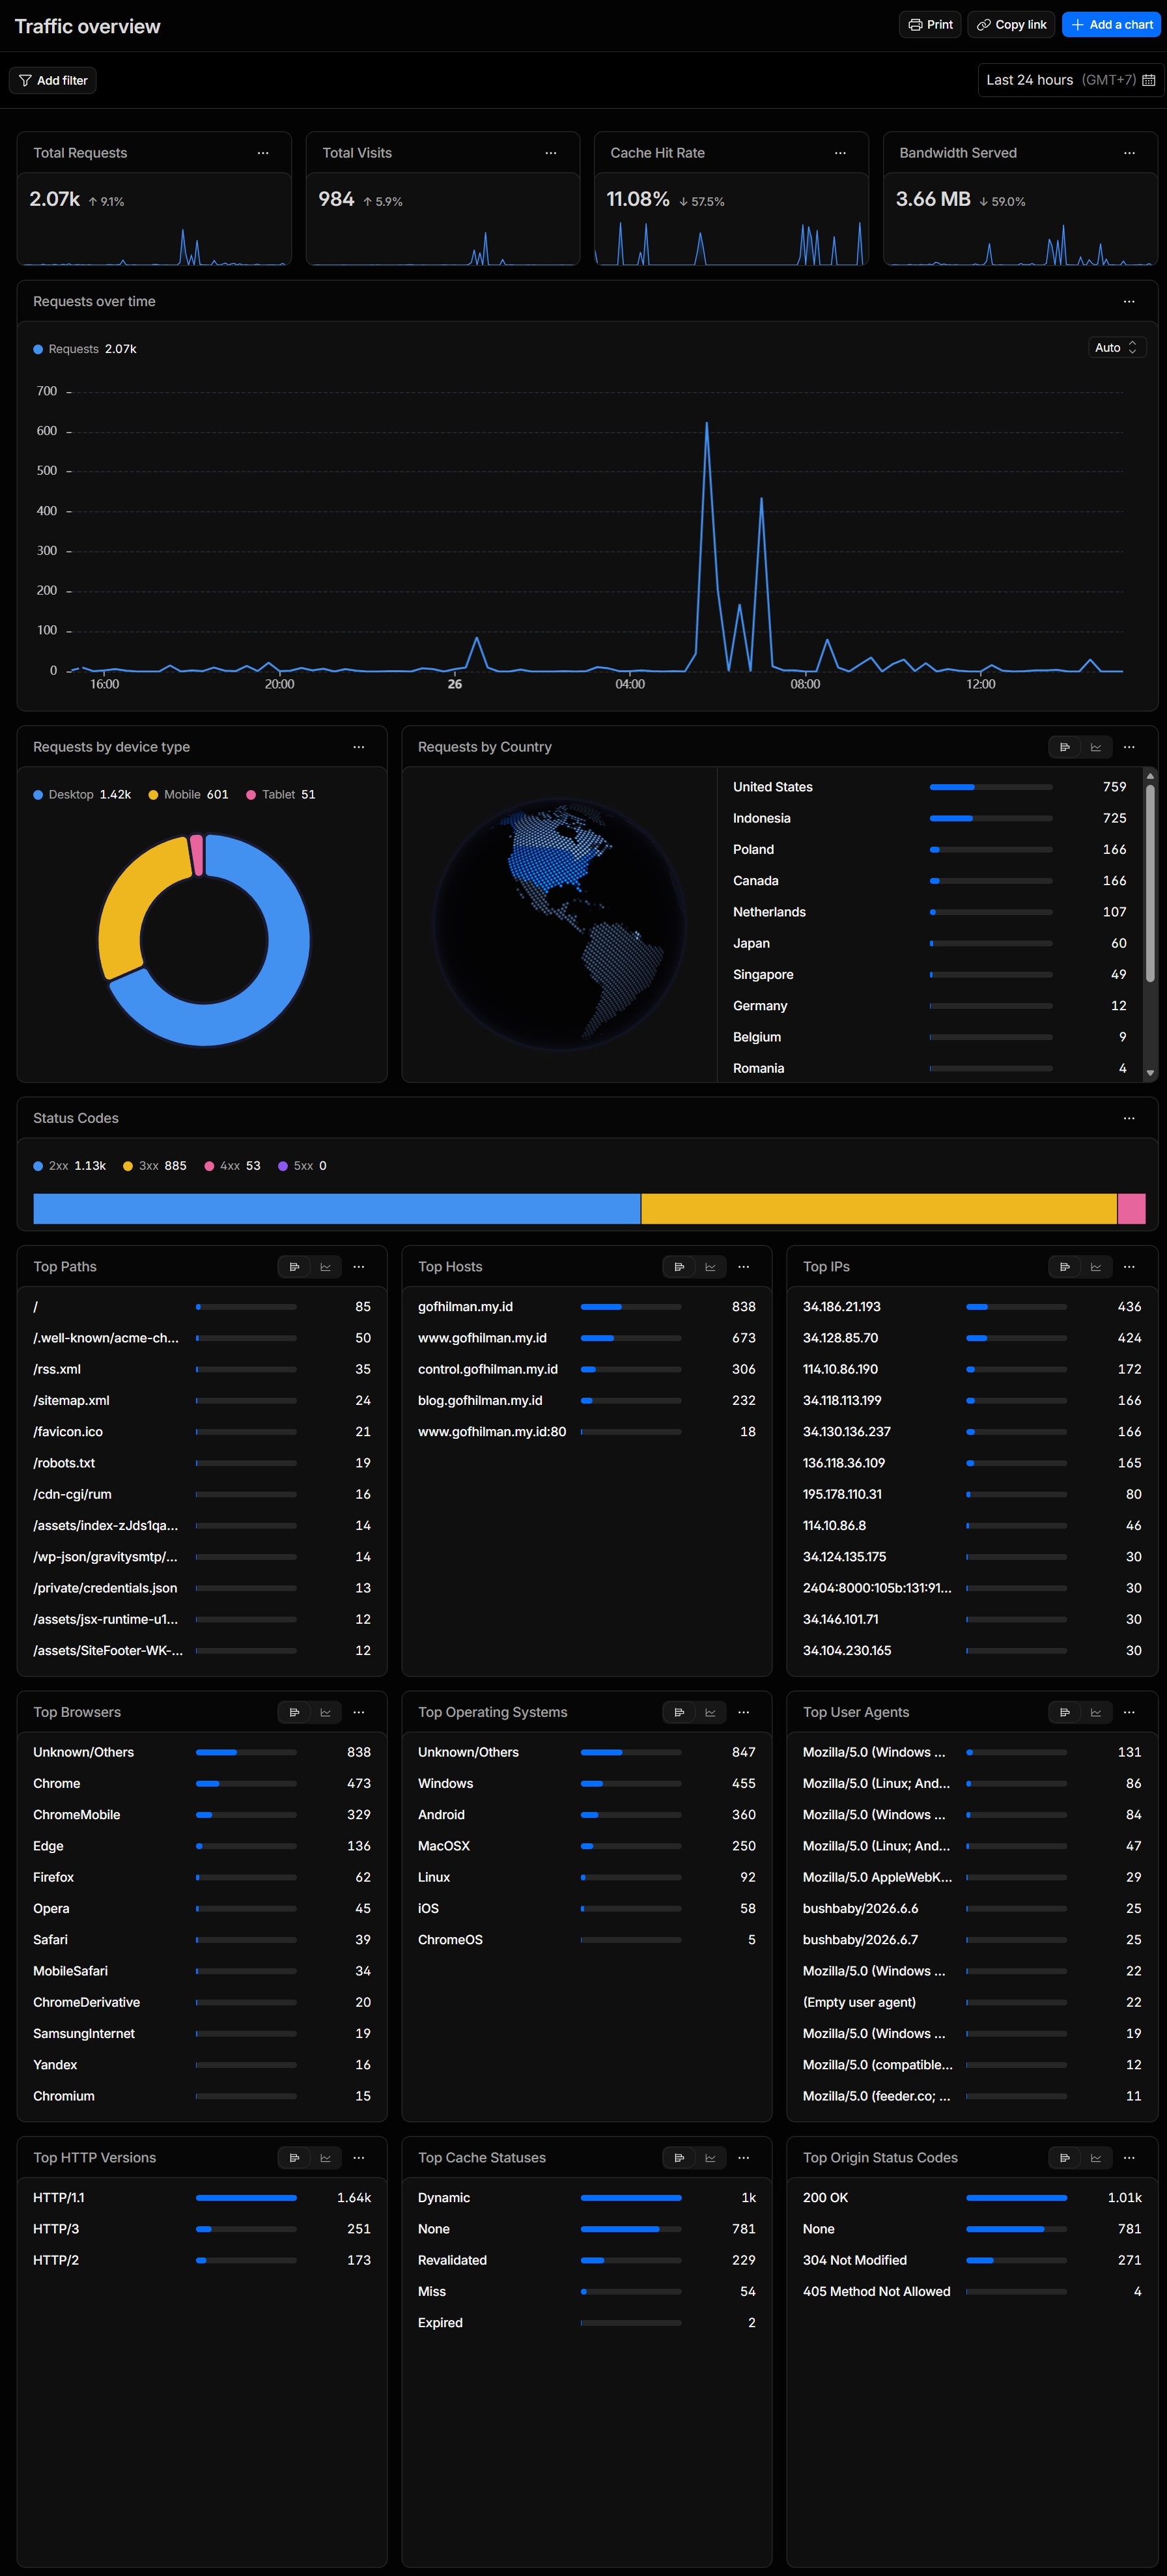
Added web traffic analytics powered by Cloudflare
As you've already seen in Stacked Control dashboard, now there is a simple link that can direct us to Cloudflare's web traffic analytics. I mean I actually can access it directly from the Cloudflare dashboard, but having the ability to access it from Stacked Control gives me more seamless blogging experience, so why not?
But, why Cloudflare analytics?
Well, it's because I host this blog on Cloudflare Pages, which means I don't have to rely on cookies, cross-site tracking, or persistent identifiers to profile users when using Cloudflare Analytics. This is because Cloudflare Analytics measures traffic natively at the network edge. As a result, I can access detailed traffic analytics without compromising user privacy.
Here are some examples of the analytics output:
Other improvements and bug fixes
There are also some small improvements, such as, increasing the resolution of this blog favicon image, improving this blog CSS like the line height, list items, and font size, and finally fixing some React frontend logic in some routes.
That's it! Thank you for reading this blog update details.