
Hello everyone, welcome to the first post of my blog. As you might guess, I actually made this blog from scratch. It was quite a journey and I learned a lot along the way. So maybe it would be nice to share how I made it.
TL; DR
I tell a story about:
- the app features
- the database schema
- how to utilize Prisma ORM many-to-many implicit relations
- implementing URI in route paths
- handling failed database connnection
- implementing toaster component
- integrating writing editor with image cloud storage and code syntax highlighter
- and many more.
This fullstack app consists of a back end to serve as the Content Management System (CMS) and two frontend Single Page Application (SPA) clients: the blog itself and the admin dashboard to manage the blog. You can access the admin dashboard at Stacked Control. You can login as a guest to explore the admin dashboard, although it won't be possible to make changes to anything because the guests just have read access only. Although we can actually create the app within a single fullstack framework for the admin and users, I think it's nice to separate the back end and the SPA front ends because we can reduce more loads on the clients, be more dynamic, and also get two different web domains for free which we can turn into separated Progresive Web Apps (PWAs).
But doesn't SPA hurt SEO?
Well, I don't really know about it, but pure React has gained many new features where, for example, we could put meta tag inside our react component that we can utilize it to improve the SEO. Some search engine crawlers like Google can actually crawl and index SPA websites too.
I dumped the project codebase at GitHub for curious people. My approach for this blog is to focus only on core features, while making it polished and minimalist as possible. Well, I had some experience blogging on WordPress in the past and this blog is exactly what I would have dreamed to have, so shout out to The Odin Project that helped me to make it possible.
Now, let's dig deeper about this blog.
The Back End
I created the back end by using Node.js with Express framework.
What's the first thing that comes into mind when starting to create an app?
For me, it would be what persistent data I want and how to organize it. Obviously we should have posts because they what makes blog a blog. Good posts may sparks a conversation and that's where users and comments come in. Last, categories may help readers navigate the blog. I used PostgreSQL to manage the database and Prisma ORM to help me migrate and query the database. The following image shows the database schema where User.role is an enum with value ADMIN, USER, or GUEST.
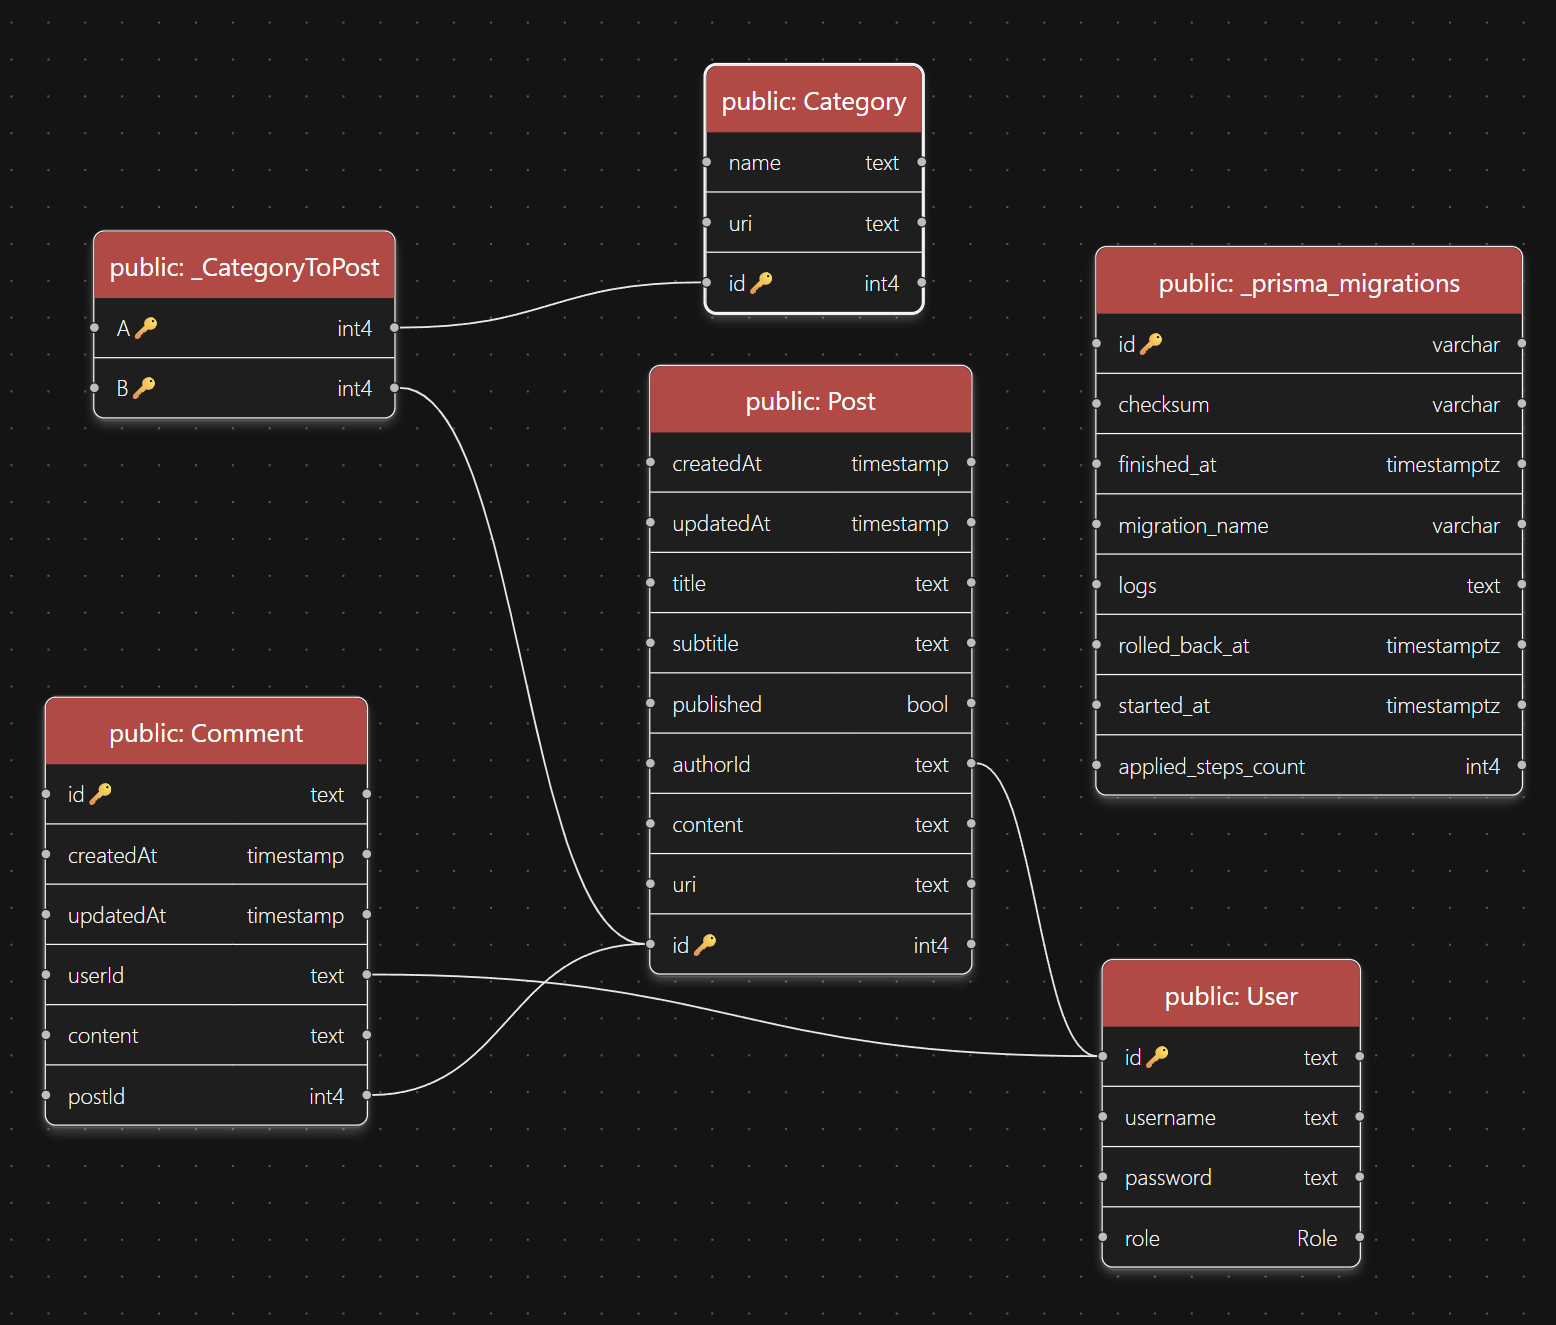
There are several interesting things here.
Prisma ORM, which abstracts away SQL queries, is also very useful in migrating the database since we never know if we will modify our schema in the future. In fact, I already did it more than five times, and the process is actually very easy with just prisma migrate dev, prisma migrate deploy, and prisma generate. The migration history data are recorded in _prisma_migrations table.
Many-to-many relation between Post and Category is handled implicitly by the ORM. It automatically creates _CategoryToPost entries that connects Post and Category. However, it is still our responsibility to connect or disconnect them. For example, in posts controller I had to disconnect all categories connecting to a specific post before I connected the post to new categories by using the following code,
await prisma.post.update({
  where: { id: postId },
  data: { categories: { set: [] } },
});
And if we wish, we could delete all categories not connected to any posts later.
await prisma.category.deleteMany({
  where: { posts: { none: {} } },
});
Most of the time, I used uri instead id to query posts and categories in the database because the fact that uri placed in post or category-related route URL would make the website links become nice to read which can improve SEO. I created the URIs by using @sindresorhus/slugify npm library to transform their name and then concatenating it with their id to enforce uniqueness. This process requires me to obtain the id first. For example, take a look at this Prisma query middleware to create a post.
import slugify from "@sindresorhus/slugify";
import { prisma } from "../lib/prisma";

async function postPost(req: any, res: any) {
  const { title, subtitle, published, content, categories } = req.body;
  const createdAt = published ? new Date() : null;
  const connectOrCreate = categories.map((name: any) => ({
    create: { name },
    where: { name },
  }));
  let post = await prisma.post.create({
    data: {
      createdAt,
      title,
      subtitle,
      published,
      content,
      categories: { connectOrCreate },
      authorId: req.user.id,
    },
    include: { categories: true },
  });
  for (const category of post.categories) {
    if (!category.uri) {
      await prisma.category.update({
        where: { id: category.id },
        data: { uri: slugify(category.name) + "-" + category.id },
      });
    }
  }
  post = await prisma.post.update({
    where: { id: post.id },
    data: { uri: slugify(post.title) + "-" + post.id },
    include: { categories: true },
  });
  res.json({ post });
}
In this snippet I didn't add the uri when creating a post, but I added the connected category uris and the post uri later after I got the post object.
Also, note that the post content is html text as opposed to the comment content which is just a plain text.
Prisma is super great, but unfortunately I had a problem when Prisma client tried to connect to the deployed database. I use free plan for the database, so it's always sleeping or inactive if it isn't used for several minutes. And the problem is Prisma client always fails to connect to sleeping database. Prisma client is only available to connect after the database wakes up. For example, this is the log error I received when Prisma tried to connect to the sleeping database:
PrismaClientKnownRequestError:
Invalid `prisma.post.findMany()` invocation:
Operation has timed out
The solution is to add a Prisma client extension to reconnect Prisma client to the database. We can make our own retry function, but here I used p-retry npm library. I made Prisma client to retry the connection ten times (pRetry default value) before giving up. I also reduced both connection and acquire timeouts to be two seconds in the PostgreSQL driver adapter. The following code shows the modification I made to the Prisma client.
import "dotenv/config";
import { PrismaPg } from "@prisma/adapter-pg";
import { PrismaClient } from "../generated/prisma/client";
import pRetry from "p-retry";

const connectionString = `${process.env.DATABASE_URL}`;

const adapter = new PrismaPg({
  connectionString,
  connectionTimeoutMillis: 2_000,
});
const prisma = new PrismaClient({ adapter }).$extends({
  query: {
    async $allOperations({ operation, model, args, query }) {
      return pRetry(async () => await query(args), {
        onFailedAttempt: ({
          error,
          attemptNumber,
          retriesLeft,
          retriesConsumed,
        }) => {
          console.warn(
            `Retrying ${model ?? "raw"}.${operation}. Attempt ${attemptNumber} failed. ` +
              `${retriesLeft} retries left. ${retriesConsumed} retries consumed.`,
          );
        },
      });
    },
  },
});

export { prisma };
Next, let's see what happens when we use the app while the database is sleeping...
Perfect, now it always works on first try and I don't have to refresh the page anymore. And when I inspect the log, I see our modification does its job very well:
Even though we don't have to log in to access the blog, authentication is still important for users to manage their comments, either to add, edit, or delete them. That's why I put login and signup buttons in the comment section. I used token-based authentication with JSON Web Token (JWT) and Passport.js for the verification. Just for refresher, this figure illustrates how JWT works.
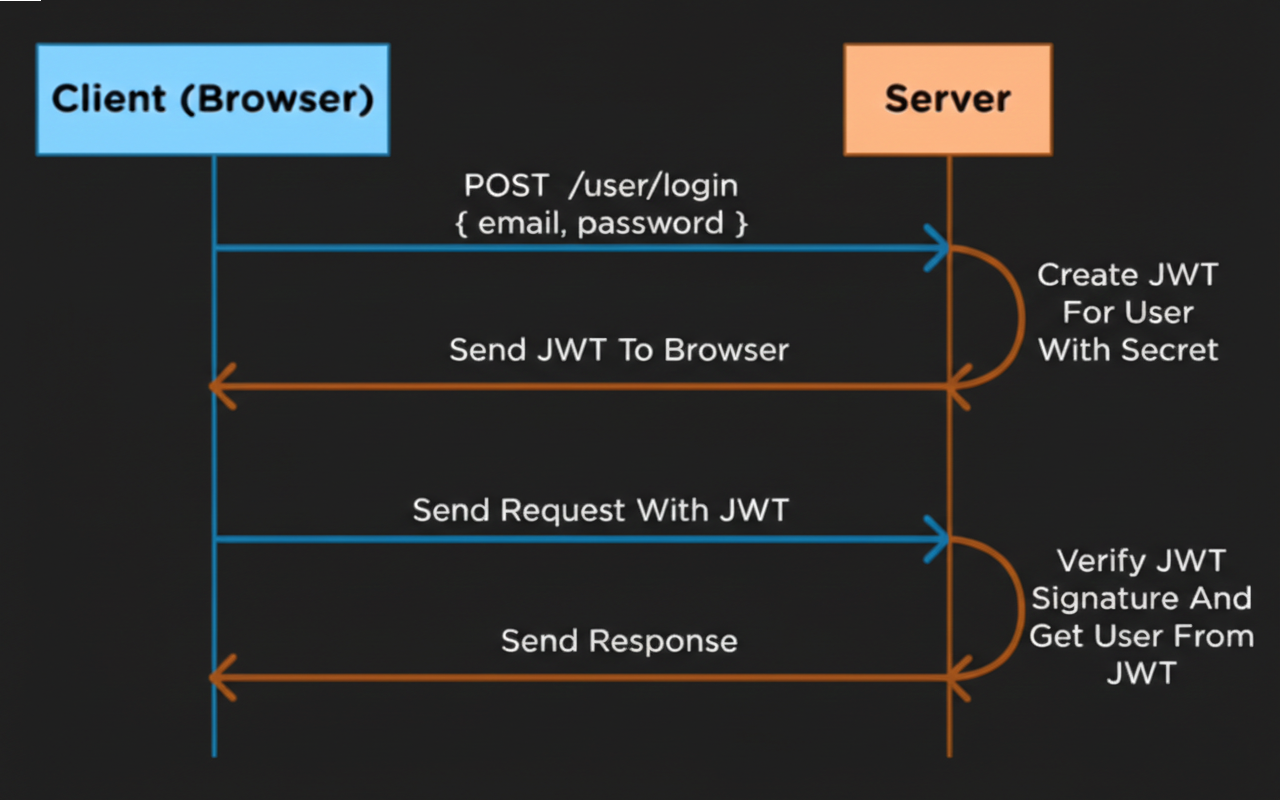
Besides verification, Passport.js is also useful in case I want to integrate more authentication strategies in the future. Using JWTs instead of sessions makes it easier for me to handle authentication for multiple client apps, which in my case, to handle admin and user apps.
In this app, there are two authentications based on role, that is admin and registered member. Admin can do all CRUD operations for posts, comments, and categories, while registered member can only do CRUD operations on their comments. All forms are validated both on server and client sides, where some sensitive validation like admin passcode only be done on server side. Furthermore, I encrypt all registering account passwords first before putting them in the database. Finally, the back end is ready to be used for the front ends by enabling Cross-Origin Resource Sharing (CORS).
The Front Ends
To be honest, the front ends were where I spent most of my time to code (and to bang my head). I use SPA with React Router Framework Mode, which uses Vite for bundling the code. I know Next.js can be used for SPA too, but I believe it is specifically optimized for SSR, which can bloat our SPAs with a lot of unwanted features. React Router Declarative Mode (the pure router one) is also a good alternative too, but I just want to make use some of framework mode features to reduce some boilerplate code and to help me organize my code as well.
The first thing I made for the front ends is API call functions that fetch the data I need from my back end and some external APIs as well. I use local storage to store and retrieve the JWT for authentication. The JWT is removed from the local storage when the user logs out from the app.
Tailwind CSS is very good to be used together with React because the components can be styled separately from the others so we don't have to worry about CSS specifity. It's also incorporated in some modern pre-made component libraries like shadcn/ui which I used a lot in this app.
Shadcn/ui actually utilizes components from third-party libraries like Radix UI and Base UI, and then wraps it inside their very opinionated themes and styles. However, the good thing about shadcn/ui is it allows us to modify the component elements directly. Therefore, a lazy developer like me now can focus more about the component functionality and modifying the app layouts or the color palette. Combobox, dialog, and sonner are some of the pre-made components that I'm very grateful to have.
I used shadcn/ui combobox to create my own combobox that can create labels if they're not found in the label list. It's very useful, for example, if the admin want to write a new category for a post inside the combobox. You can find out how it works at Stacked Control's create new post page (use the guest account to log in). Also, see my combobox implementation code on GitHub.
I used a lot of dialogs, for example, in editing category and comment as well as in all delete operation confirmations. The dialog component saves me a lot of time I would've spent in writing React state for dialog modal logic.
Sonner is actually a new shadcn/ui component for a toaster made by Sonner. I used it to notify the users for ongoing, error, and success actions. I think it's crucial for visual feedback especially something that need to be processed for a couple of seconds. A good example is when user logs into the app. Take a look at the following login route component.
import { data, Form, redirect, useSubmit } from "react-router";
import { postLogin } from "~/api/authApi";
import { useRef } from "react";
import { toast } from "sonner";
import type { Route } from "./+types/login";

export async function clientAction({ request }: Route.ClientActionArgs) {
  const formData = await request.formData();
  const user = Object.fromEntries(formData);
  try {
    await postLogin(user);
    return redirect(`/?id=${user.toastId}`);
  } catch (error: any) {
    const errors = await error.json();
    return data({ errors }, { status: error.status });
  }
}

export default function Login({ actionData }: Route.ComponentProps) {
  const errors = actionData?.errors;
  const loadingToast = useRef<any>(null);
  const submit = useSubmit();

  if (errors) {
    const id = loadingToast.current;
    if (id) {
      loadingToast.current = null;
      toast.error("Failed to log in", { id });
    }
  }

  return (
    // Another JSX code...
    <Form
	  id="login"
	  method="post"
	  onSubmit={(event) => {
	    event.preventDefault();
	    const id = toast.loading("Logging in...");
	    loadingToast.current = id;
	    const formData: any = new FormData(event.currentTarget);
	    formData.set("toastId", id);
	    submit(formData, { method: "post" });
	  }}
    >
      // Another JSX code...
    </ Form>
    // Another JSX code...
  );
}
First, I trigger the toast component using loading toast by intercepting the form submission. I use the return value of loading toast to modify the toast later and save its valued using useRef hook. I also put the id in the form data. The loading toast will trigger a Toaster component in the root route which shows the toast.
import {
  Links,
  Outlet,
  Scripts,
  ScrollRestoration,
} from "react-router";

import type { Route } from "./+types/root";
import "./app.css";
import { Toaster } from "./components/ui/sonner";

export function Layout({ children }: { children: React.ReactNode }) {
  return (
    <html lang="en" className="dark">
      <head>
        <meta charSet="utf-8" />
        <meta name="viewport" content="width=device-width, initial-scale=1" />
        <Links />
      </head>
      <body>
        {children}
        <ScrollRestoration />
        <Scripts />
        <Toaster position="top-center" />
      </body>
    </html>
  );
}

export default function App() {
  return <Outlet />;
}
After the action finished, it will trigger either error or success toast that depends on which route the app goes. If it goes back to login route because of login failure, it will run the error conditional code block which executes error toast that modifies the loading toast by referring the toast id we already saved using useRef hook.
If the action is success, it will redirect to home route with id search paramater containing the toast id value. In the home route component, I already put the code to trigger toast success with this toast id and then delete the search parameter with useEffect hook.
import { useSearchParams } from "react-router";
import { toast } from "sonner";
import { useEffect } from "react";
import type { Route } from "./+types/home";

export default function Home({ loaderData }: Route.ComponentProps) {
  // some code here...
  const [searchParams, setSearchParams] = useSearchParams();

  useEffect(() => {
    const id = searchParams.get("id");
    if (id) {
      toast.success("You're now logged in", { id: +id });
      searchParams.delete("id");
      setSearchParams(searchParams);
    }
  }, [searchParams, setSearchParams]);

  return (
    // some JSX code here...
  );
}
Yeah, it took a lot of effort just to run this tiny component.
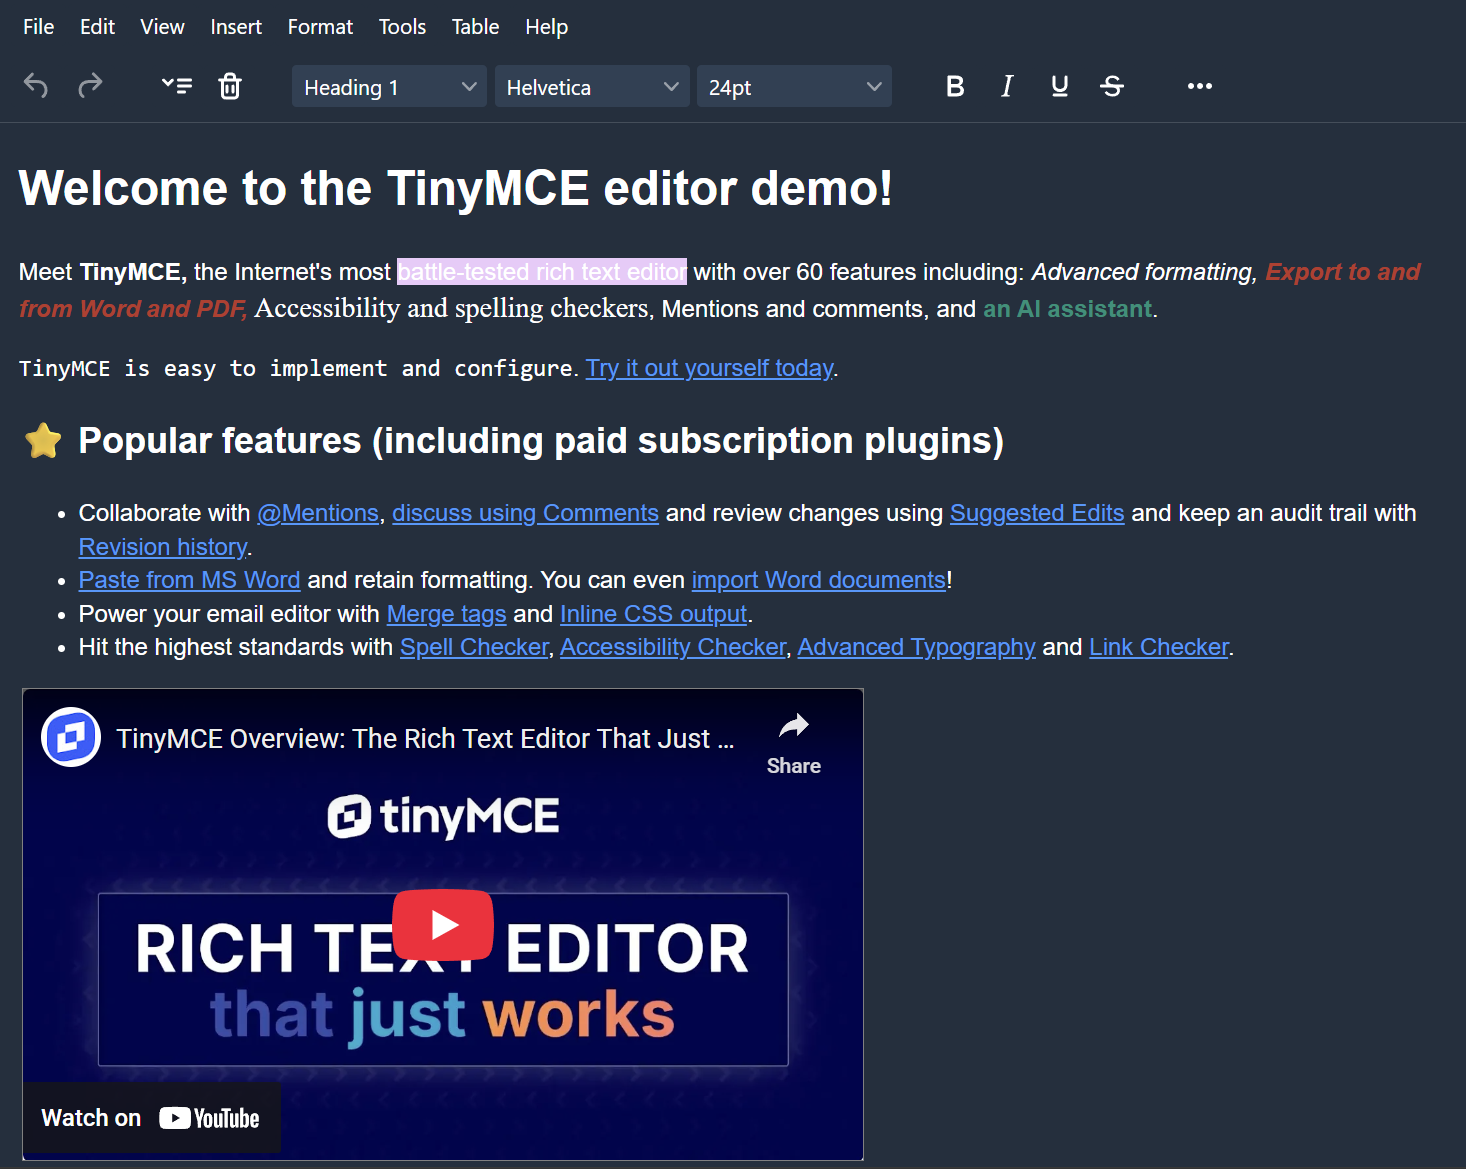
The next component worth mentioning is the editor, where authors spend most of their time. I use TinyMCE for the editor. They have both cloud (paid) and local (free) versions. Their documentation is very good so we can set up our local version quite easily actually. They also have a lot of very good free plugins. However, my problem is actually their lack of skin options. The editor only offers one dark skin which the example is shown below.
The colors are not quite right for my blog, so I decided to create my own editor skin and luckily they provide a very good guide to create a custom skin. Following the guide by forking their open-source code, here is my custom skin.
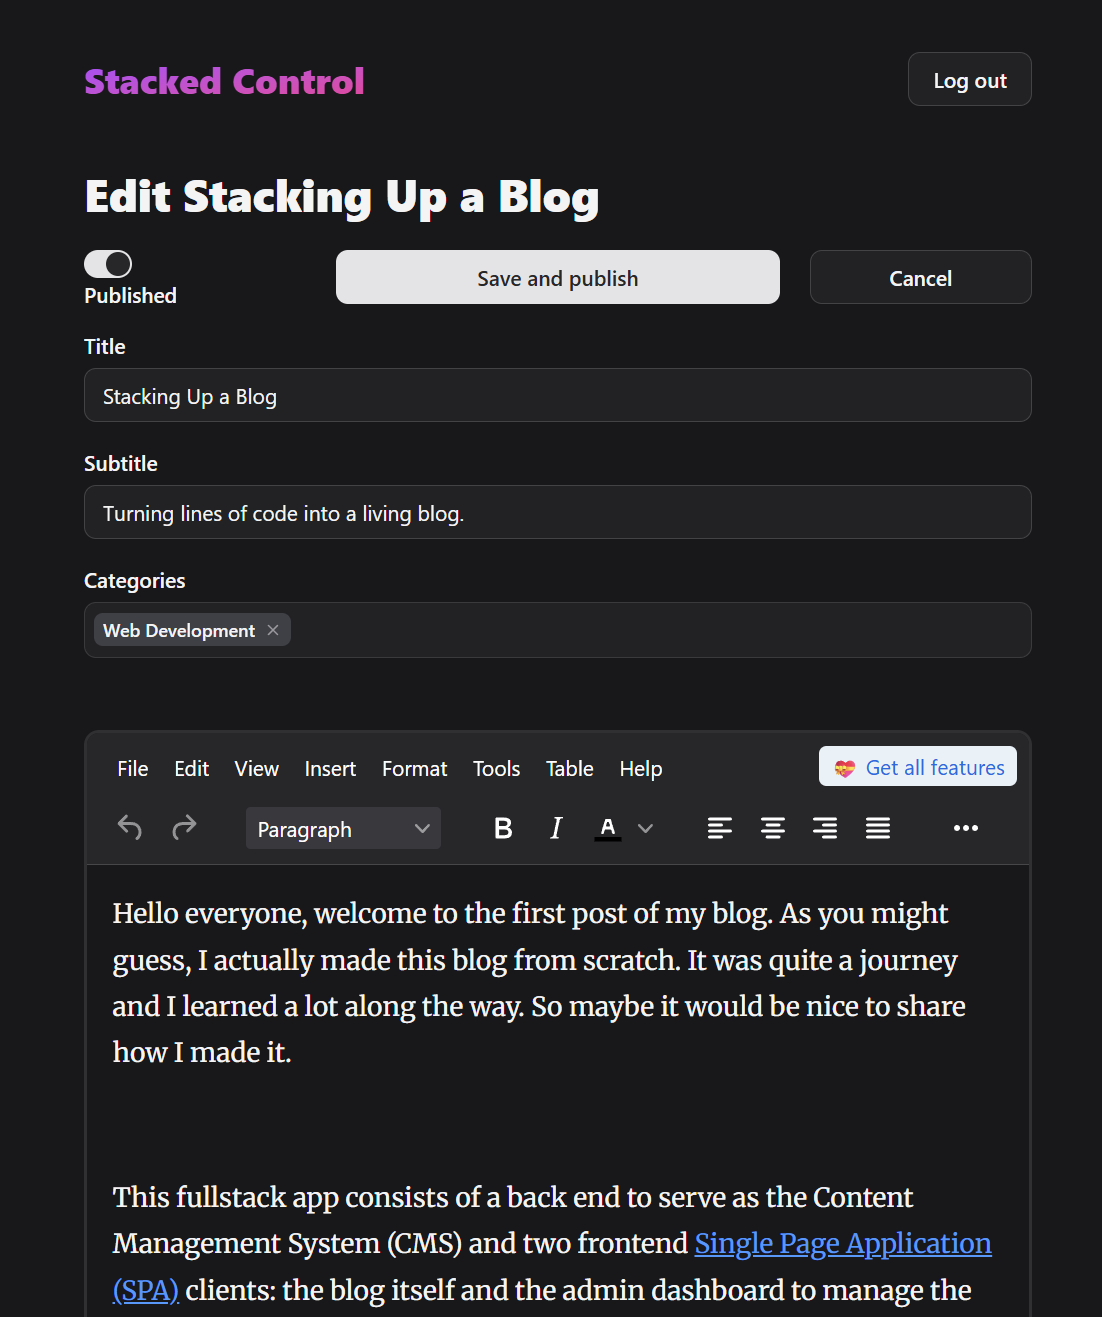
It blends well with the other form fields now.
My next problem for the editor is to store the image that the author uploads. I use Cloudinary for the storage because I love their generosity for free use above all. Fetching their API and integrating it into TinyMCE is also not really difficult.
const imageUploadUrl = `https://api.cloudinary.com/v1_1/${import.meta.env.VITE_CLOUDINARY_CLOUD_NAME}/image/upload`;

export async function postImage(blobInfo: any) {
  const formData = new FormData();
  formData.append(
    "upload_preset",
    import.meta.env.VITE_CLOUDINARY_UNSIGNED_UPLOAD_PRESET,
  );
  formData.append("tags", "browser_upload");
  formData.append("file", blobInfo.blob(), blobInfo.filename());

  const response = await fetch(imageUploadUrl, {
    method: "POST",
    body: formData,
  });
  if (response.status === 403)
    throw { message: "HTTP Error: " + response.status, remove: true };
  if (!response.ok) throw "HTTP Error: " + response.status;
  const json = await response.json();
  if (!json || typeof json.secure_url !== "string")
    throw "Invalid JSON: " + JSON.stringify(json);

  return json.secure_url;
}
Because I love sharing code, the editor won't be really useful if it doesn't have syntax highlighter. TinyMCE uses Prism for code syntax highlighter. However, integrating it with the editor as well as this blog is quite difficult because we have to know about their hidden APIs to make it work on React apps (well, it took me some time to find the documentation page).
The basic idea of Prism is actually to transform our code plain text into a text sprinkled with span tags containing different class, which they call tokens, by using their JavaScript file or API to analyze the text structure and keywords according to a specific language. Then the result is going to be styled with their CSS file. But actually, I found a Prism CSS file on Dracula Theme that suits my blog better than the official Prism options. I modified it a little bit to make it work perfectly on my blog and done! The syntax highlighter is ready like you've seen in this post.
The most important thing about creating the editor is to make sure the styling inside the editor match the styling in the blog post so there will be no visual difference in both of them. Therefore, I had to make sure that I duplicated some CSS files and prism.js file and placed them in the admin and user front ends. Eventually, I still need to take care about CSS specifity despite using Tailwind CSS in my apps.
Finally, I created a global pending UI when users waiting the page to load during navigating. It's quite easy to implement it in React Router framework mode, you can explore it in React Router tutorial. The global pending UI I use is loading three dots pulse and three dots jumping that I created using Motion.
So that's the story about stacking up this blog. Let me knows what you think in the comments.